How to Change Font on Samsung One UI 4.1/4.0 firmware update | Galaxy S22 Series

Samsung just recently launched new flagship phones and tablets under Galaxy S22 series and the Galaxy Tab S8 series. These new devices feature Samsung’s latest One UI 4.1 firmware update. While One UI 4.1 is still based on Android 12, it comes with tons of new features and updated Samsung apps with more features on top of the One UI 4.0.
Samsung also recently started rolling out One UI 4.1 update to the older Galaxy S21 series, Galaxy S20 series, Note 20 series, Galaxy S10, and the Note 10 series phones. The OEM also promised the same for several Samsung S-series, Note-series, and Fold-series devices in the upcoming months in the recent press release here.
As for the features, the One UI 4.1 update features improved Color Palette (similar to Material You visuals), Google Duo Live Sharing, Smart Switch with advanced configurations, Smart Widgets, feature to share Wi-Fi credentials with Quick Share, and Smart Suggestions across the system.
Some of the best features of the update are the Shadow Eraser as well as Reflection Eraser baked into the Gallery app. This is similar to the Magic Eraser feature from the Google Photos app. The stock camera app also gets updated with enhanced night portraits to take stunning portraits in low light. The Samsung camera app also got a tweaked user interface and added the full director’s view mode!
See more One UI 4.1 features from our previous posts. Links above
Custom Fonts for Samsung
In addition to this, Samsung’s Good Lock 2022 support for One UI 4 based Android 12 OS is the best part. The only thing missing, in my opinion, is the support for custom Fonts. It’s long overdue and the Font installer apps listed below work flawlessly with the latest One UI version.
In this tutorial, you will learn how to download and install any font on your Samsung Galaxy device running One UI 4.1/4.0 firmware update. It also works on previous One UI 3.0, 2.5, 2.1, 1.0 based on Android 11, 10, 9 Pie, or earlier. You can install any font using a .TTF file format. This includes Google Sans, Roboto, Product Sans, Rubik (which we use on our site), and much more.
In our previous posts, we already published a tutorial on how to install Google Sans Font for Samsung Galaxy devices. However, that was a little complicated. Here is an easier way to do so.
Thanks to projects like Flipfont and zFont 3, installing ay font or even a .TTF font on any Samsung device is now possible. So you can fonts on Galaxy S21, S20, Note 20, Note 10/10+, S10, and more.
As for the previous One UI 1.0 or Samsung Experience firmware, our previous post on Wings fonts works perfectly on Samsung phones with Android 9 Pie or earlier such as the Galaxy S8 series or the Note 8 series. However, if you are inclined, you can also use the following method to get Google Sans font.
Step 1: Download Font TTF File
The zFont 3 and FlipFont apps that we are going to use have a collection of free fonts. You can use stock fonts listed in the app like the Samsung Sans or the 1800+ stock Flip Fonts.
However, it also supports installation of custom fonts using .TTF files. So it is very important that you download fonts from the web in .TTF format only.
Here we have listed the most popular fonts in the Android community. One such font is the Google Sans font (upgraded Product Sans Font) exclusive to the Pixel smartphones.
- Download Google Sans Font (post link)
- Download Google Product Sans Font (post link)
- Download Roboto Font (direct link)
Download unlimited fonts from the web
The internet has tons of font collections. A simple Google search should get you started. However, for convenience, we are listing some font repositories for ease.
- Download Google Fonts
- Fonts (dot com)
- BeFonts
- Important tool! Fount (select any font from the web)
Note for Fount: Drag and drop the “Fount” button in the browser’s bookmark. Then visit a webpage and click on the Fount button in your bookmark bar and select any text to find the font.
Download Best Fonts: Google Sans, iOS Font, Samsung One Font
Step 2. Download & Install Font Installer app onto your Samsung device
There are two known font apps available for Samsung Galaxy devices that can install custom fonts on the latest One UI 4.1/4.0.
Download one of the following Font changer apps:
- zFont 3 APK from Play Store | Telegram Channel link | Source
- FlipFont APK from here (direct link) | Telegram Channel Link | Source
Step 3. Installation
Method 1. Install any Font onto Samsung Galaxy phone using zFont 3 app
- Make sure you have Samsung account signed in on your phone for backing up settings.
- Download and install zFont 3 app from above.
- Launch the zFont 3 app.
- Go to “Dashboard” tab.
- Choose the language.
- Search for any font like “Google Sans”.
- Select and apply.
Follow the steps listed in the app. (Prerequisites)
- It should ask you to install Samsung Sans font.
- Update the app.
- Apply the Samsung Sans font from phone settings.
- Backup “Settings”. Select “Settings” only.
- Uninstall Samsung Sans font.
Now, the how-to change section
- Select “Install Google Sans font”
- Now, change the font to default.
- Select Restore Data option and tick Settings only.
Alternatively, you can also download a TTF font file and apply it using the last “Local” tab.
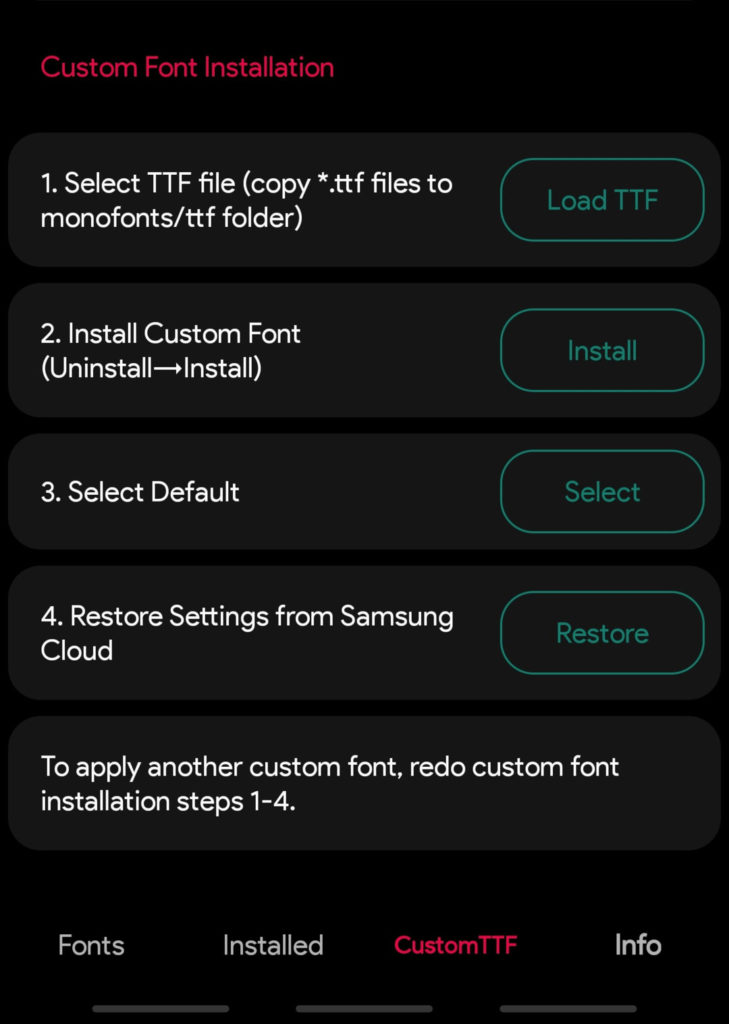
- From the custom TTF section “Select TTF file”
- Click “Load TTF”.
- Click Install Custom Font option.
- This should uninstall and install the Samsung Sans font.
- Restore settings from Samsung. Tick “Setting only”.
- This should install the custom font on your device.
Video tutorial for zFont app. Thanks to u/ashuravb06.
Method 2. Install any Font for Samsung Galaxy phone using FlipFont
- Download and install FlipFont APK from here (direct link). OR from the downloads repository.
- Download any font from the downloads section above.
- Extract the zip file to get the
.ttffont. Look for regular font. You can go bold or medium too. - Transfer the font file to phone’s storage at this location:
monofonts/ttf - Create the ttf folder if it doesn’t exist.
- Launch FlipFont app on your on your Samsung phone. It should be by the name
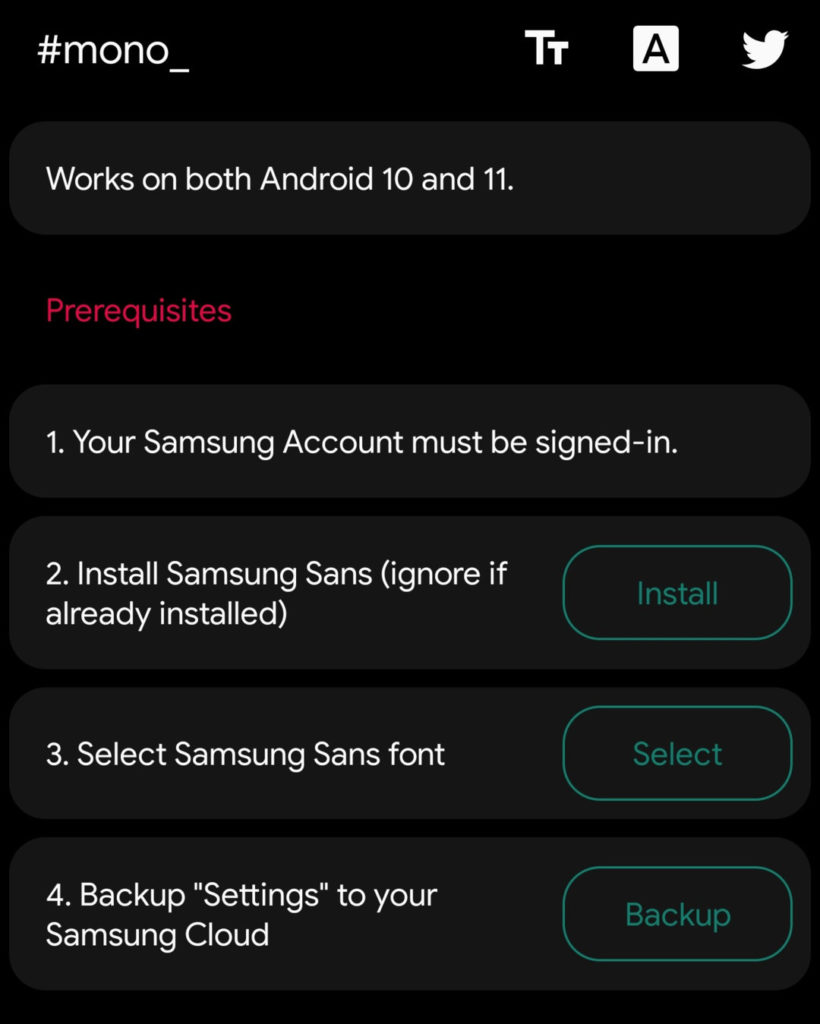
#mono_ - Make sure you have Samsung account signed in on your phone for backing up settings.
- Click on install. Install Samsung Sans font.
- Click on select. Select Samsung Sans font.
- Backup “Settings” to your Samsung Cloud. Tick “Settings” only.
- From the custom TTF section “Select TTF file”
- Click “Load TTF”.
- Click Install Custom Font option.
- This should uninstall and install the Samsung Sans font.
- Restore settings from Samsung. Tick “Setting only”.
- This should install the custom font on your device.
Note: For backup and restore, go to Settings -> Accounts and Backup -> Backup and Restore -> Backup data -> Check “Settings” only.
Checkout the screenshots from below for installation and how the Google Sans font looks like.
Tutorial screenshots:


