How to Block Ads using Private DNS (DNS over TLS) Feature on Android 11, 10, 9.0 Pie without root

Updated: The tutorial also works on Android 11, 10, and 9 Pie. Included is a a tutorial on how to whitelist apps while using Adguard DNS. Google introduced many new features with Android 9 Pie. This includes adaptive battery, adaptive brightness, app actions, dark or night mode, revamped material design, navigation gestures, home pill, and much more. However, there is one particular feature, called Private DNS a.k.a DNS over TLS, we believe is one of the most underrated features of Android 9 Pie. With DNS over TLS, you can basically change or connect to a different DNS on your Android phones easily. Just like we used Cloudflare DNS in our previous tutorial for privacy, here we will use the Adguard DNS to block ads and popups on your Android devices natively.
How does Adguard DNS work? Adguard is a popular AdBlocking tool that is available across platforms. It is available for Windows, Android, Linux, and more. Here in this tutorial, we will show you how to make use of Adguard DNS to keep your device safe from malicious ads, popups, and more. So once you setup, all your queries will be sent to the particular DNS and it will filter out any or all the ads and popups from the source. This is similar to how Adblock browser extensions work. Anything that is related to advertisement is blocked.
The biggest advantage of using a this feature is that you get rootless systemwide ad-blocking on your Android devices. Meaning, once you setup, all you apps and browsers will be clean from ads and be served under adblockers. Unfortunately, you cannot change hosts files. Meaning, you cannot choose the URLS you want to block.
Generally, in order to block ads on Android, your device either need to be rooted or use a VPN like Blockada to But we all know how VPN sometimes be memory hogging and a battery drainer. So this is the best solution.
How to setup Adguard Private DNS over TLS (dns.adguard.com) on Android 11, 10, 9 Pie?
Note that all the queries will be redirected or served under Adguard DNS. So if you are concerned about your privacy, then you should definitely read their privacy policies. Or you can also use BLAH DNS which is an alternative. Also note that this tutorial only works on devices running Android 9.0 Pie or later and tested working on Samsung Galaxy S9 with One UI.
- Make sure your device is running Android 9.0 Pie or later.
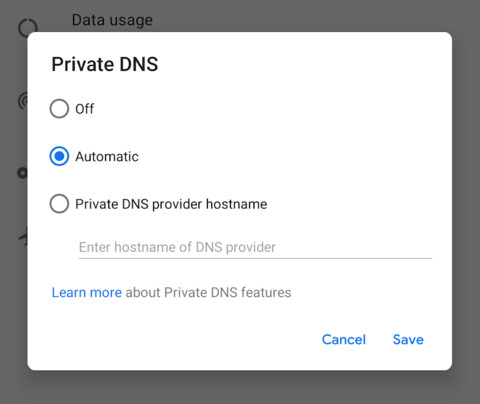
- Now, go to Settings > Network & internet settings > Private DNS.
- For Samsung Galaxy devices go to Settings > Connections > More connection settings > Private DNS
- Or simply search Private DNS from settings search bar.

- Input the complete string which resolves to the particular DNS. You cannot use numbers. Use any one of the following.
For Adguard DNS: (normal):
dns.adguard.com
For Adguard DNS: (Family protection – non adult stuff):
dns-family.adguard.com
Blah DNS: (alternative hobby project)
dot-de.blahdns.com
- Hit save and enjoy.
- You can also reboot the device if you like.
- Read for Chrome not blocking Ads
- Using Adguard DNS? Here is how to whitelist apps from dns.adguard.com
Fix Chrome for Android not blocking Ads
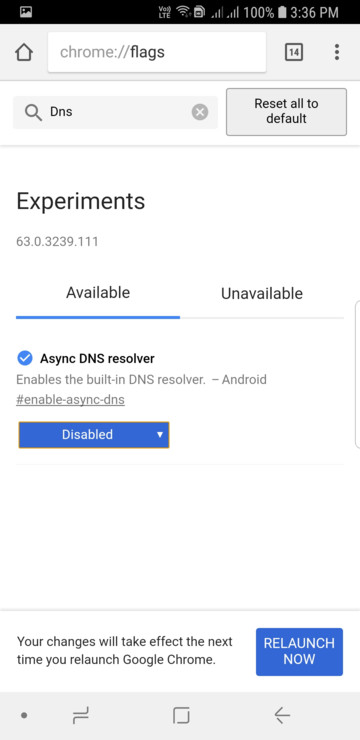
Due to some changes in Chorme browser for Android, the browser seems to bypass the DNS. Making the DNS Adblocker obsolete. There is a simple fix for this. You simply need to change the flag.
- Launch Chrome app.
- Enter the URL “chrome://flags”, without quotes, into the address bar.
- You will see a new window with many flags.
- Search for “dns”.
- Set the “Async DNS” option to “Disabled” and close the tab.

You will also need to clear the DNS cache.
- Enter “chrome://net-internals”, without quotes, into the address bar.
- Select the DNS tab, and tap on “Clear Cache”.
- Restart Chrome.
This should fix you problem with Ad-Blockers.
How to setup Adblocking DNS at WiFi router level?
For a complete secure network, you can also setup DNS over WiFi router. See instructions below.
- Connect to your WiFi router.
- Enter your router’s IP address in your browser. Usually
192.168.0.1or192.168.1.1 - Input the username and password to log into your router. This information may be labeled on the router itself.
- In your router’s configuration page, locate the DNS server settings. Usually under Network > Advanced.
- Note down any existing DNS server entries for future reference.
- Replace or add the following DNS addresses:
176.103.130.130and176.103.130.131for “Default”;176.103.130.132and176.103.130.134for “Family protection”
- Save your settings, then restart your browser and router as well.
- Now visit your favorite website and see if it works.
You may also like:


