The current flagship phone from Samsung, the Galaxy Note 7, comes with Android 6.0.1 Marshmallow out of the box. As we have listed in our earlier tutorial, the full firmware files are already available for download and can easily restore the Note 7 to full stock. Moreover, the development has already started, so contributors and Android enthusiasts have already come up with the root procedure for this sweet device. XDA members brought the Auto-Root procedure for Note 7 into notice for variants like SM-N930F, N930FD, N930S, N930L, N930K, N930X
and all the Exynos processor running variants. So take a note that you do not use this method on Snapdragon variants.
The CF-Auto-Root procedure has always been the most liked root procedure for the Samsung Galaxy devices. If you don’t want to go through all this hassle of installing TWRP recovery and flashing the SuperSU package manually, then Auto-Root method is the best. A similar method has been introduced by XDA members, except here, we make use of the stock rootable Kernel instead of a CFAR file. All you need to do is flash the Auto-Root Kernel via Odin software and you are done. Before you proceed, make sure you are on the required Marshmallow ROM on Galaxy Note 7 or at least have the Marshmallow bootloader. Also, read the warning before you proceed. We will also be looking forward to listing the alternate TWRP method to root Note 7 once it is available. UPDATE: TWRP for Galaxy note 7 is now available. Download it now and root using the TWRP and SuperSU package.
Download Auto-Root Kernel, TWRP & Root files for Note 7:
Download latest TWRP 3.0.2 for Galaxy Note 7
- TWRP Note 7 N930F/FD/S/K/L Unified → Download Link | Mirror
Use for method 2 only.
Flash latest Beta SuperSU v2.77 for Note 7 via TWRP for root access
A new latest Beta version has been released to root most of the Samsung Galaxy Note 7 models. Visit this page for source.
- Latest Beta SuperSU 2.77 → | BETA-SuperSU-v2.77-20160827190633.zip
You may also like:
- Latest stable SuperSU 2.76 → Download Link | Mirror
Use for method 2 only.
Tools Required to Root Galaxy Note 7:
- Odin Software → Download link | Link to latest Odin
- Samsung Galaxy Drivers → Download | File: SAMSUNG_USB_Driver_for_Mobile_Phones.zip
Supported devices:
- SM-N930F
- SM-N930FD
- SM-N930S
- SM-N930L
- SM-N930K
- All Exynos models.
Notes and Warnings for Note 7 root:
Important Note! If for some reason you do not come across a problem like Note 7 stuck in Boot loop, soft bricked, etc. you can always restore your Galaxy Note 7 to stock firmware.
Warning: Once you root or install a custom package like TWRP, your warranty may be void and trip Knox counter for Samsung. We at AndroidSage won’t be liable for any damage to your Android device. So you should be cautious about it. Reader’s discretion is advised.
Method 1: How to easily Root Samsung Galaxy Note 7 on Android 6.0.1 Marshmallow?
Download Auto-Root Kernel for Note 7
- Stock Rootable Kernel for Note 7 → Download | All variants listed
Use for method 1 only.
Features of Note 7 AutoRoot Kernel:
- Based on stock Kernel
- Patched sepolicy
- Disabled dm-verity
- Auto Root (SuperSU 2.76 SYSTEMLESS)
First, download all the necessary files from the download section [rootable kernel, Odin, Samsung drivers, etc]. Now transfer these files to your PC where you can easily locate them. Follow the sequence to successfully root Note 7.
Requirements
1. Verify your device for compatibility. The listed firmware is compatible with Note 7 series devices running on Exynos processors only.
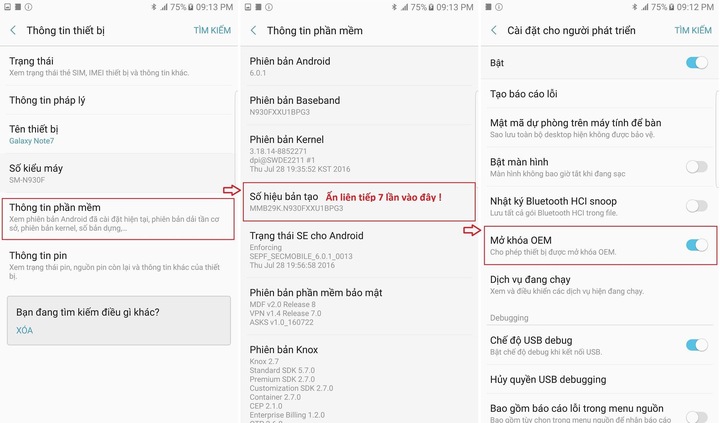
2. Enable USB Debugging on your device. To do so, go to Settings>About Phone> Tap on the Build Number several times until you get a new Developer Options in theSettings. Open Developer Options and enable USB Debugging from there. Trust the connection by allowing it when you connect it to your PC for the first time.
3. Now go to Settings>Developer Options and Enable OEM Unlock. This is important! Not doing this might end up with boot problems or be unable to flash later on.

5. Make sure you have latest device drivers setup on your PC for a better connection. Get it from the download section official from the manufacturer.
6. Backup everything before you proceed. Odin may perform a clean install. Hence, you will lose apps, data, media, etc.
Rooting Instructions
Make sure you have gone through the requirements listed above. Moreover, this is a brief Odin usage tutorial. For a detailed tutorial go to this page: How to use Odin to install Kernel, TWRP, CFAR, etc. on Samsung devices? If you already know how to use Odin, then take a look at the instructions below.
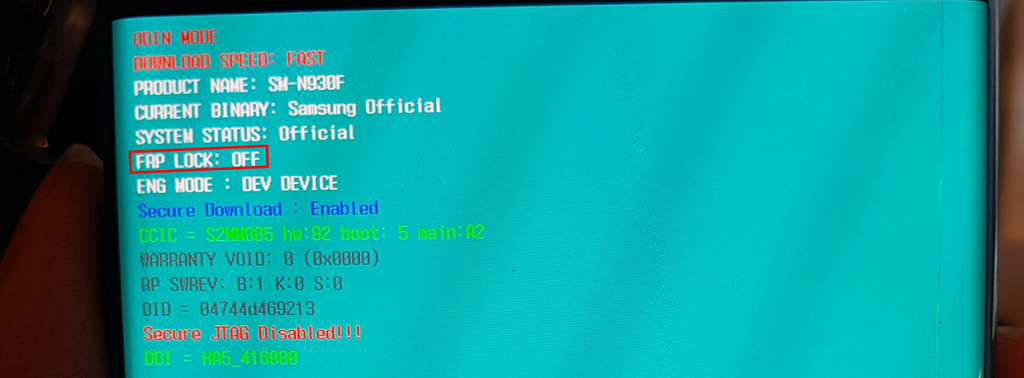
Step 1: Reboot into the bootloader or Odin mode on your Note 7 device. To do so, turn your phone off completely and press the volume down, home and power buttons simultaneously for a few seconds.

Step 2: Now download and run Odin3_v3.12.3.exe app on your PC. Run Odin as Administrator.
Step 3: Now connect your Galaxy device to your computer. In Odin, Click on AP and add the Rootable Kernel (*.tar.md5) file.
Step 4: Once successful, hit Start and wait for the procedure to complete.
Step 5: Once you flash all the necessary files, reboot to system and install the SuperSU app from Play Store to grant root access. It’s recommended to install the SuperSU app from Google Play Store and update binaries.
Method 2: How to Root Galaxy Note 7 using TWRP and latest SuperSU?
The procedure is simple. Simply flash the TWRP recovery onto Note 7 using the Odin software. You can make use of the tutorial above method or simply visit this page to know how to install TWRP on Samsung Galaxy devices. Once you setup TWRP, all you need to do is download the SuperSU package, reboot into TWRP, and flash it using TWRP recovery.
Check root access using the root checker app:
That’s it. Enjoy root access on your Note 7 running on latest Marshmallow firmware. Like and share us on social media. If you need any help, then comment down below.
Source: XDA

![Download BGMI 3.1.0 APK + OBB [Battlegrounds Mobile India 3.1]](https://www.androidsage.com/wp-content/uploads/2022/07/Battlegrounds-Mobile-India-2.1.0-APK-Download-BGMI-2.1-APK-and-OBB.jpg)


![Download GCAM 8.4 APK For All Samsung Galaxy Devices [Exynos and Snapdragon]](https://www.androidsage.com/wp-content/uploads/2022/04/GCAM-8.4-APK-Download-For-Samsung-Galaxy-Devices-Exynos-and-Snapdragon.jpg)


![Nothing OS 2.5.5 OTA for Phone 2a rolling out with updated camera and April 2024 Patch [Download] 12 Nothing OS 2.5.5 OTA for Phone 2a rolling out with updated camera and April 2024 Patch [Download]](https://www.androidsage.com/wp-content/uploads/2024/04/Downlaod-Nothing-OS-2.5.5-rolling-out-for-Phone-2a.jpg)
Leave a Reply